Innovations / Solutions / Applications / Cloud-Native
AgileGuru Engineering blog on innovative solutions and technical excellence by engineers and architects.

Automate CI / CD On-boarding process ( Job orchestration ) in Jenkins in an easy to scale and GitOps friendly way.
Guru Raghupathy, 20 January 2026
Onboarding projects and jobs in Jenkins manually is error-prone, tedious and doesn't scale. Consistently choosing the right folder, Git repository, credentials, and other standards across all jobs is a significant challenge. By using a simple plugin and an external Git repository as a "seed," we can automate this process, instructing Jenkins to create, update, or delete jobs automatically. All you need to do is update a configuration file in your Git repository and run a single "Seed Job."
Seed jobs / DSL to automate workflow
Jenkins provides a powerful Groovy-based Domain Specific Language (DSL) that allows you to manage its configuration as code. The Job DSL is a specific DSL for creating and managing Jenkins jobs using an intuitive, code-based syntax. This guide assumes you have a basic understanding of Groovy or Java. To get started, you must install the needed extra plugins as descrie below and have admin access.
Step - By - Step Guide to implement Automated Job Orchestration
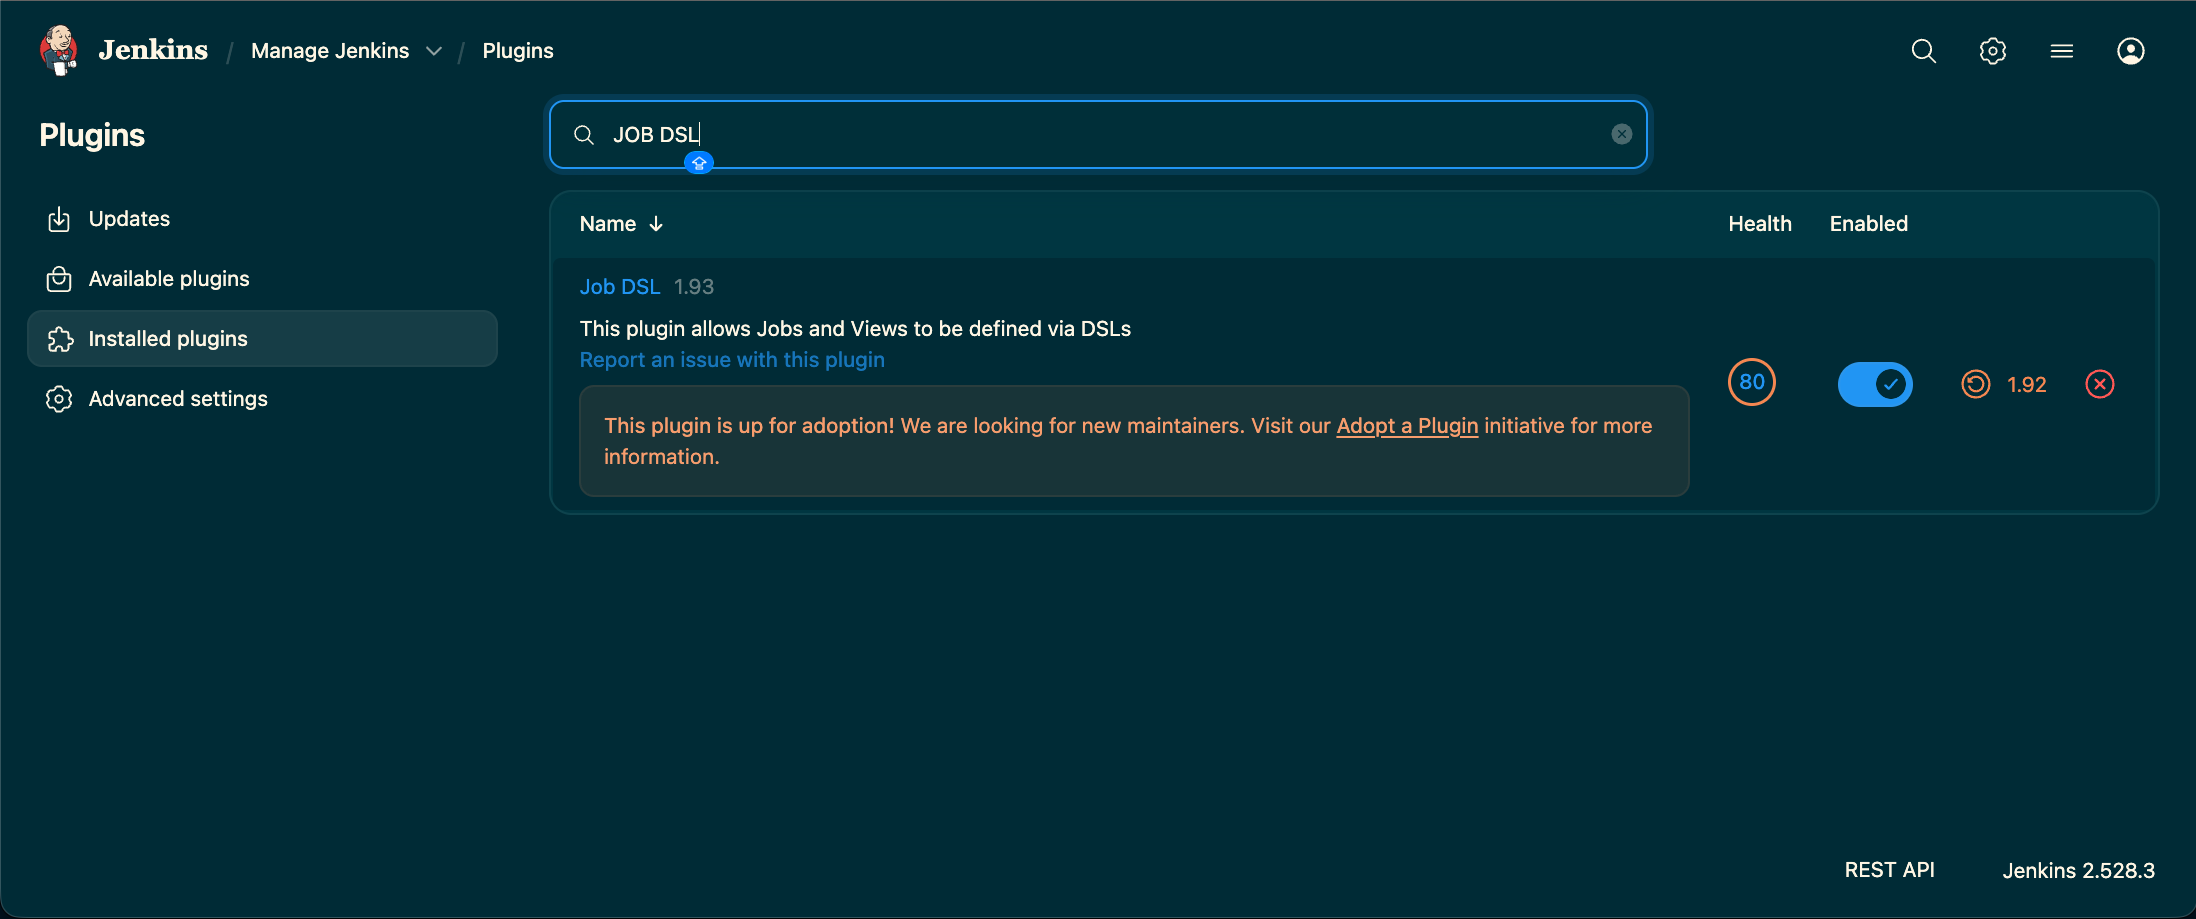
Step 1. Ensure the Required Plugins are Installed
- JOB DSL Plugin
- List View Plugin
- Multibranch Pipeline Plugin
- Folders Plugin (usually installed by default)
- Git Plugin and a provider plugin (e.g., GitHub Branch Source)
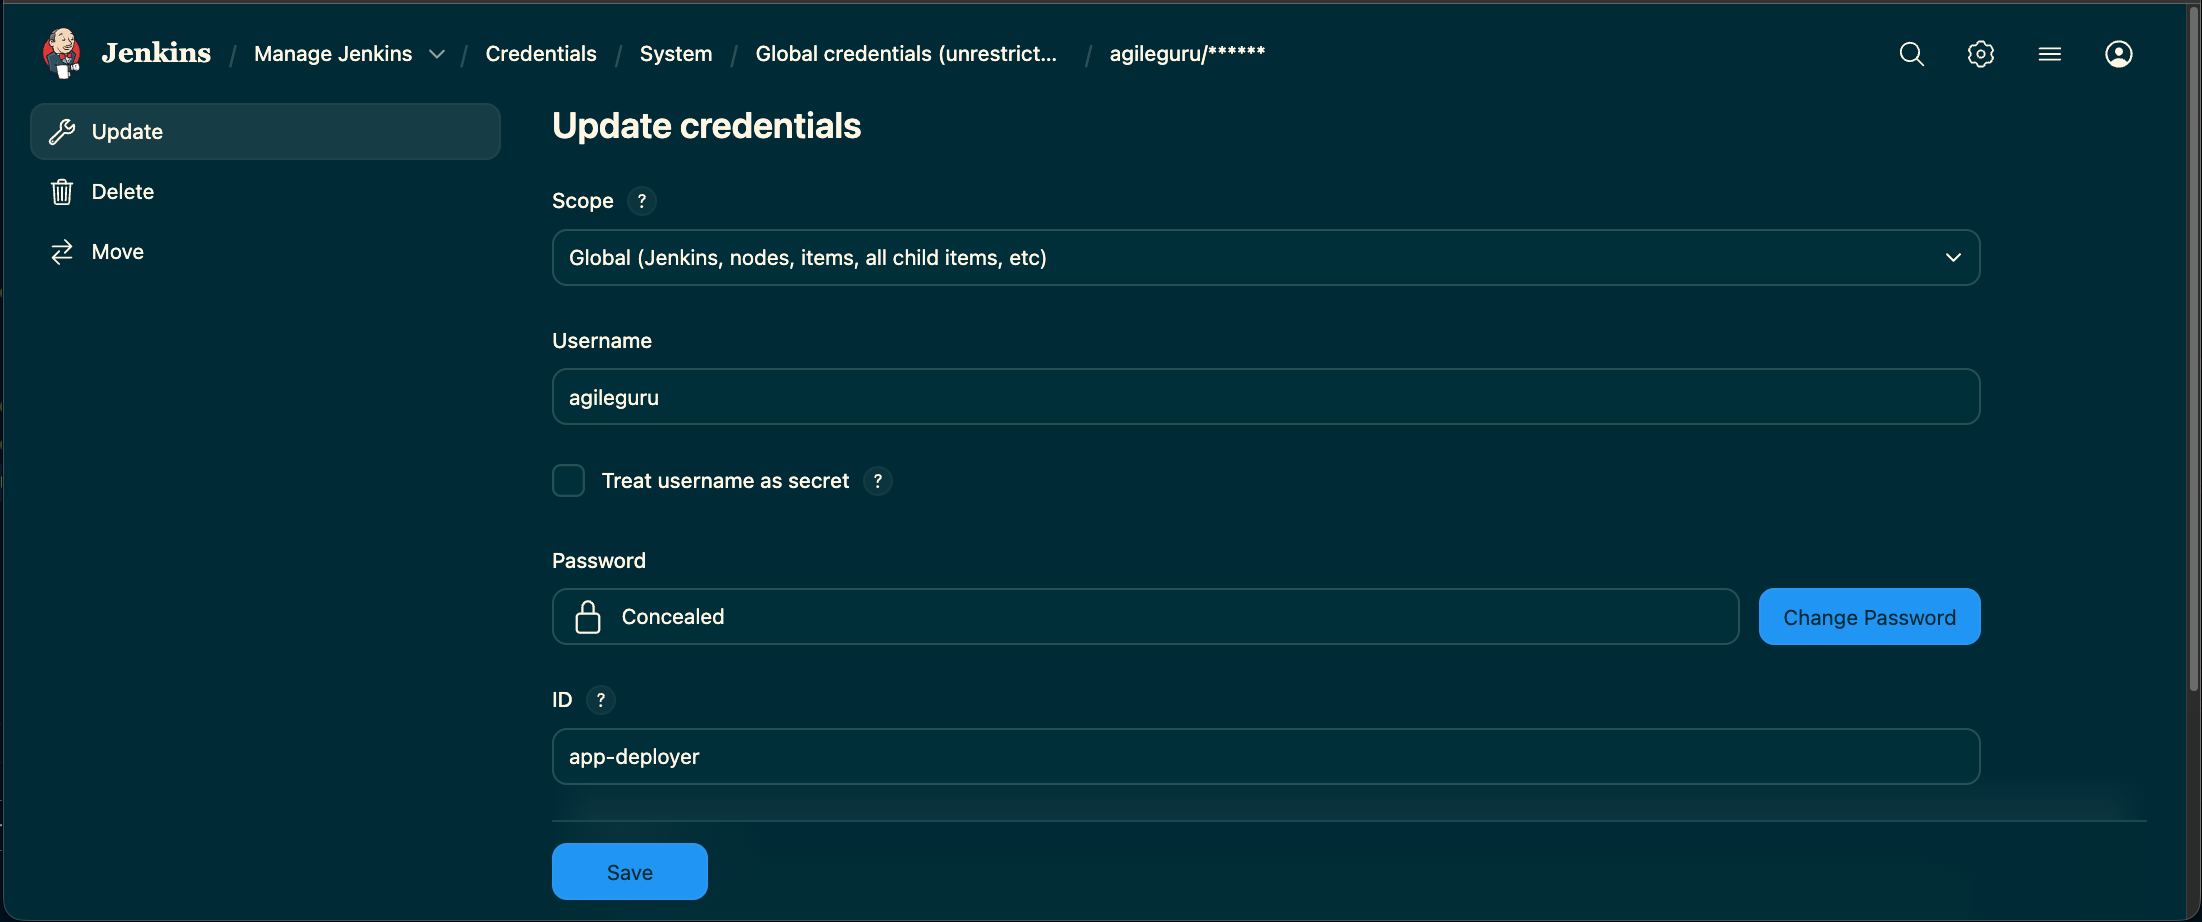
Step 2. Create Credentials to Access Your Git Repositories
Create a credential (e.g., with a username and personal access token) that Jenkins can use to access your Git repositories. Note the ID of the credential, as you will need it later. In our example, we use the ID app-deployer.
Step 3. Set Up the Seed Job Git Repository
Create a new Git repository to hold your job orchestration logic. Copy all the Groovy files from the Jenkins Job Maker Repository into your new repository. These will be the DSL scripts that will describe your job definitions.
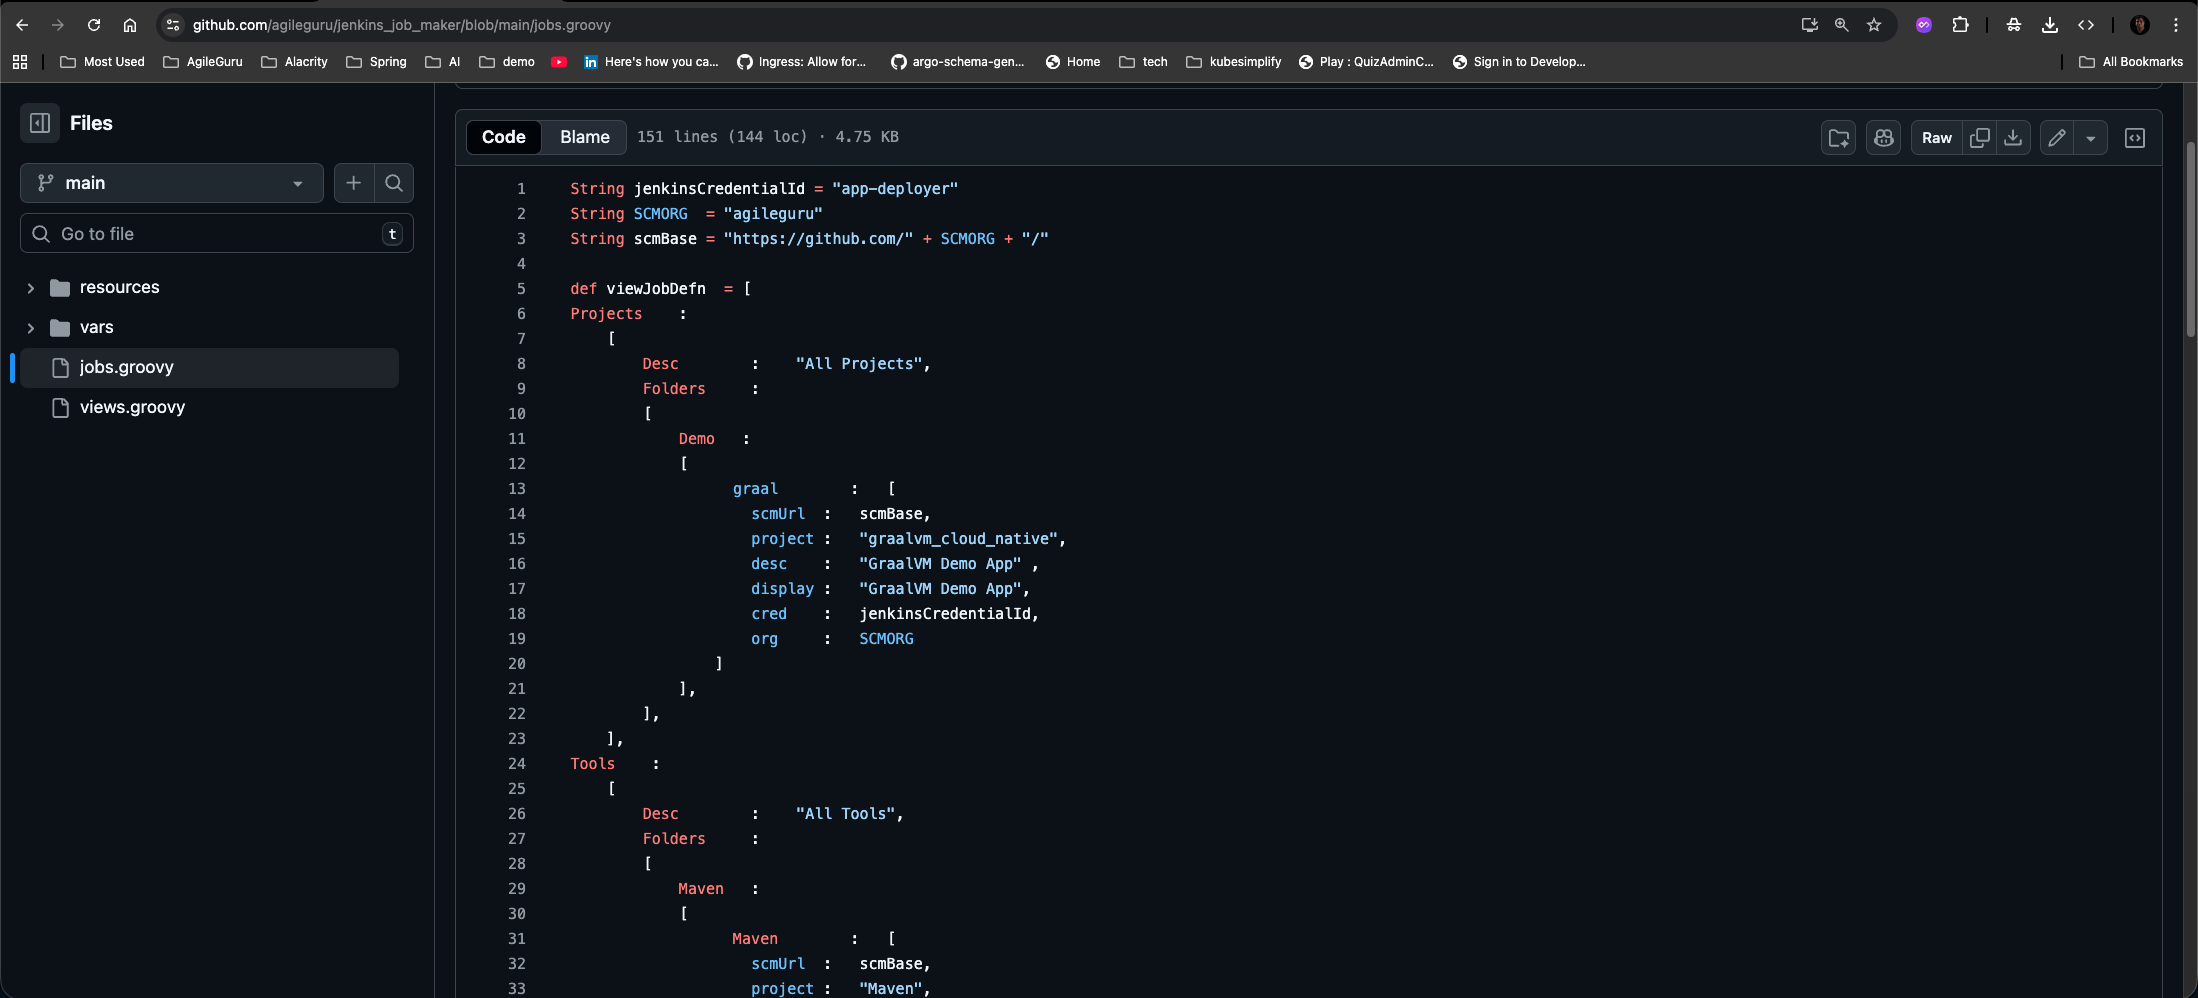
Step 4. Define Your Jobs in jobs.groovy
In your new repository, open the jobs.groovy file. This is where you will define the folders and multibranch pipeline jobs that Jenkins should create. The structure is a Groovy map that looks like JSON.
    String jenkinsCredentialId = "app-deployer"
    String SCMORG  = "agileguru"
    String scmBase = "https://github.com/" + SCMORG + "/"


    def viewJobDefn  = [
        // Name of The Top Level Folder Name
        Projects    :
            [
                Desc        :    "All Projects",
                Folders     :
                [
                    Demo   :
                    [
                        graal        :   [
                            scmUrl  :   scmBase,
                            project :   "graalvm_cloud_native",
                            desc    :   "GraalVM Demo App",
                            display :   "GraalVM Demo App",
                            cred    :   jenkinsCredentialId,
                            org     :   SCMORG
                        ]
                    ],
                ],
            ],
    ]
Step 5. Creating the Seed job
Create a new Freestyle project in Jenkins. This will be your "Seed Job" — the single job you run to create all other jobs.
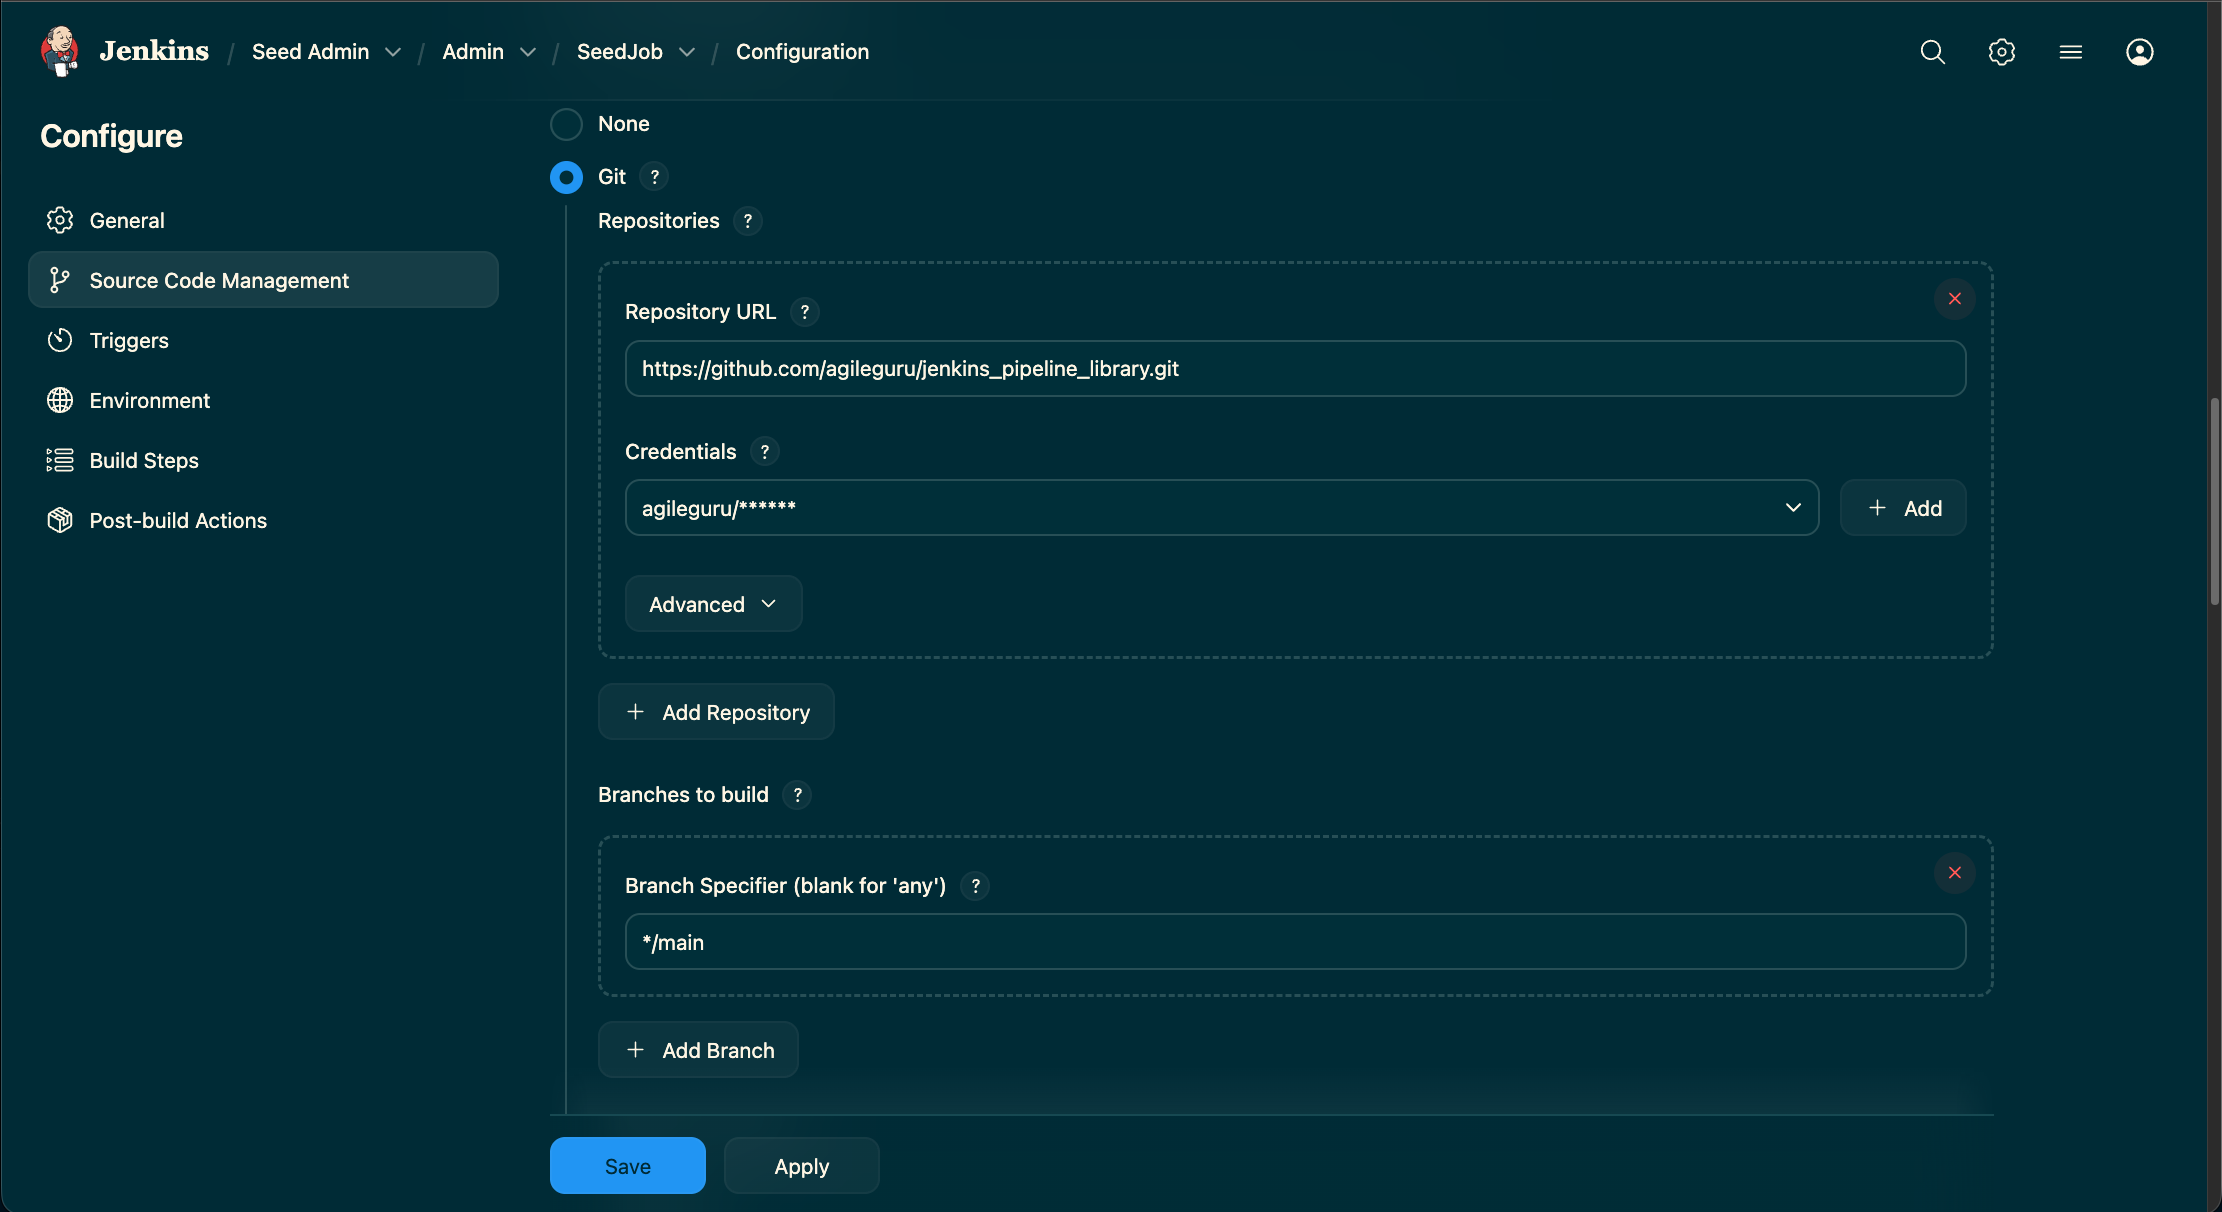
Step 6. Configure & Execute the Seed job
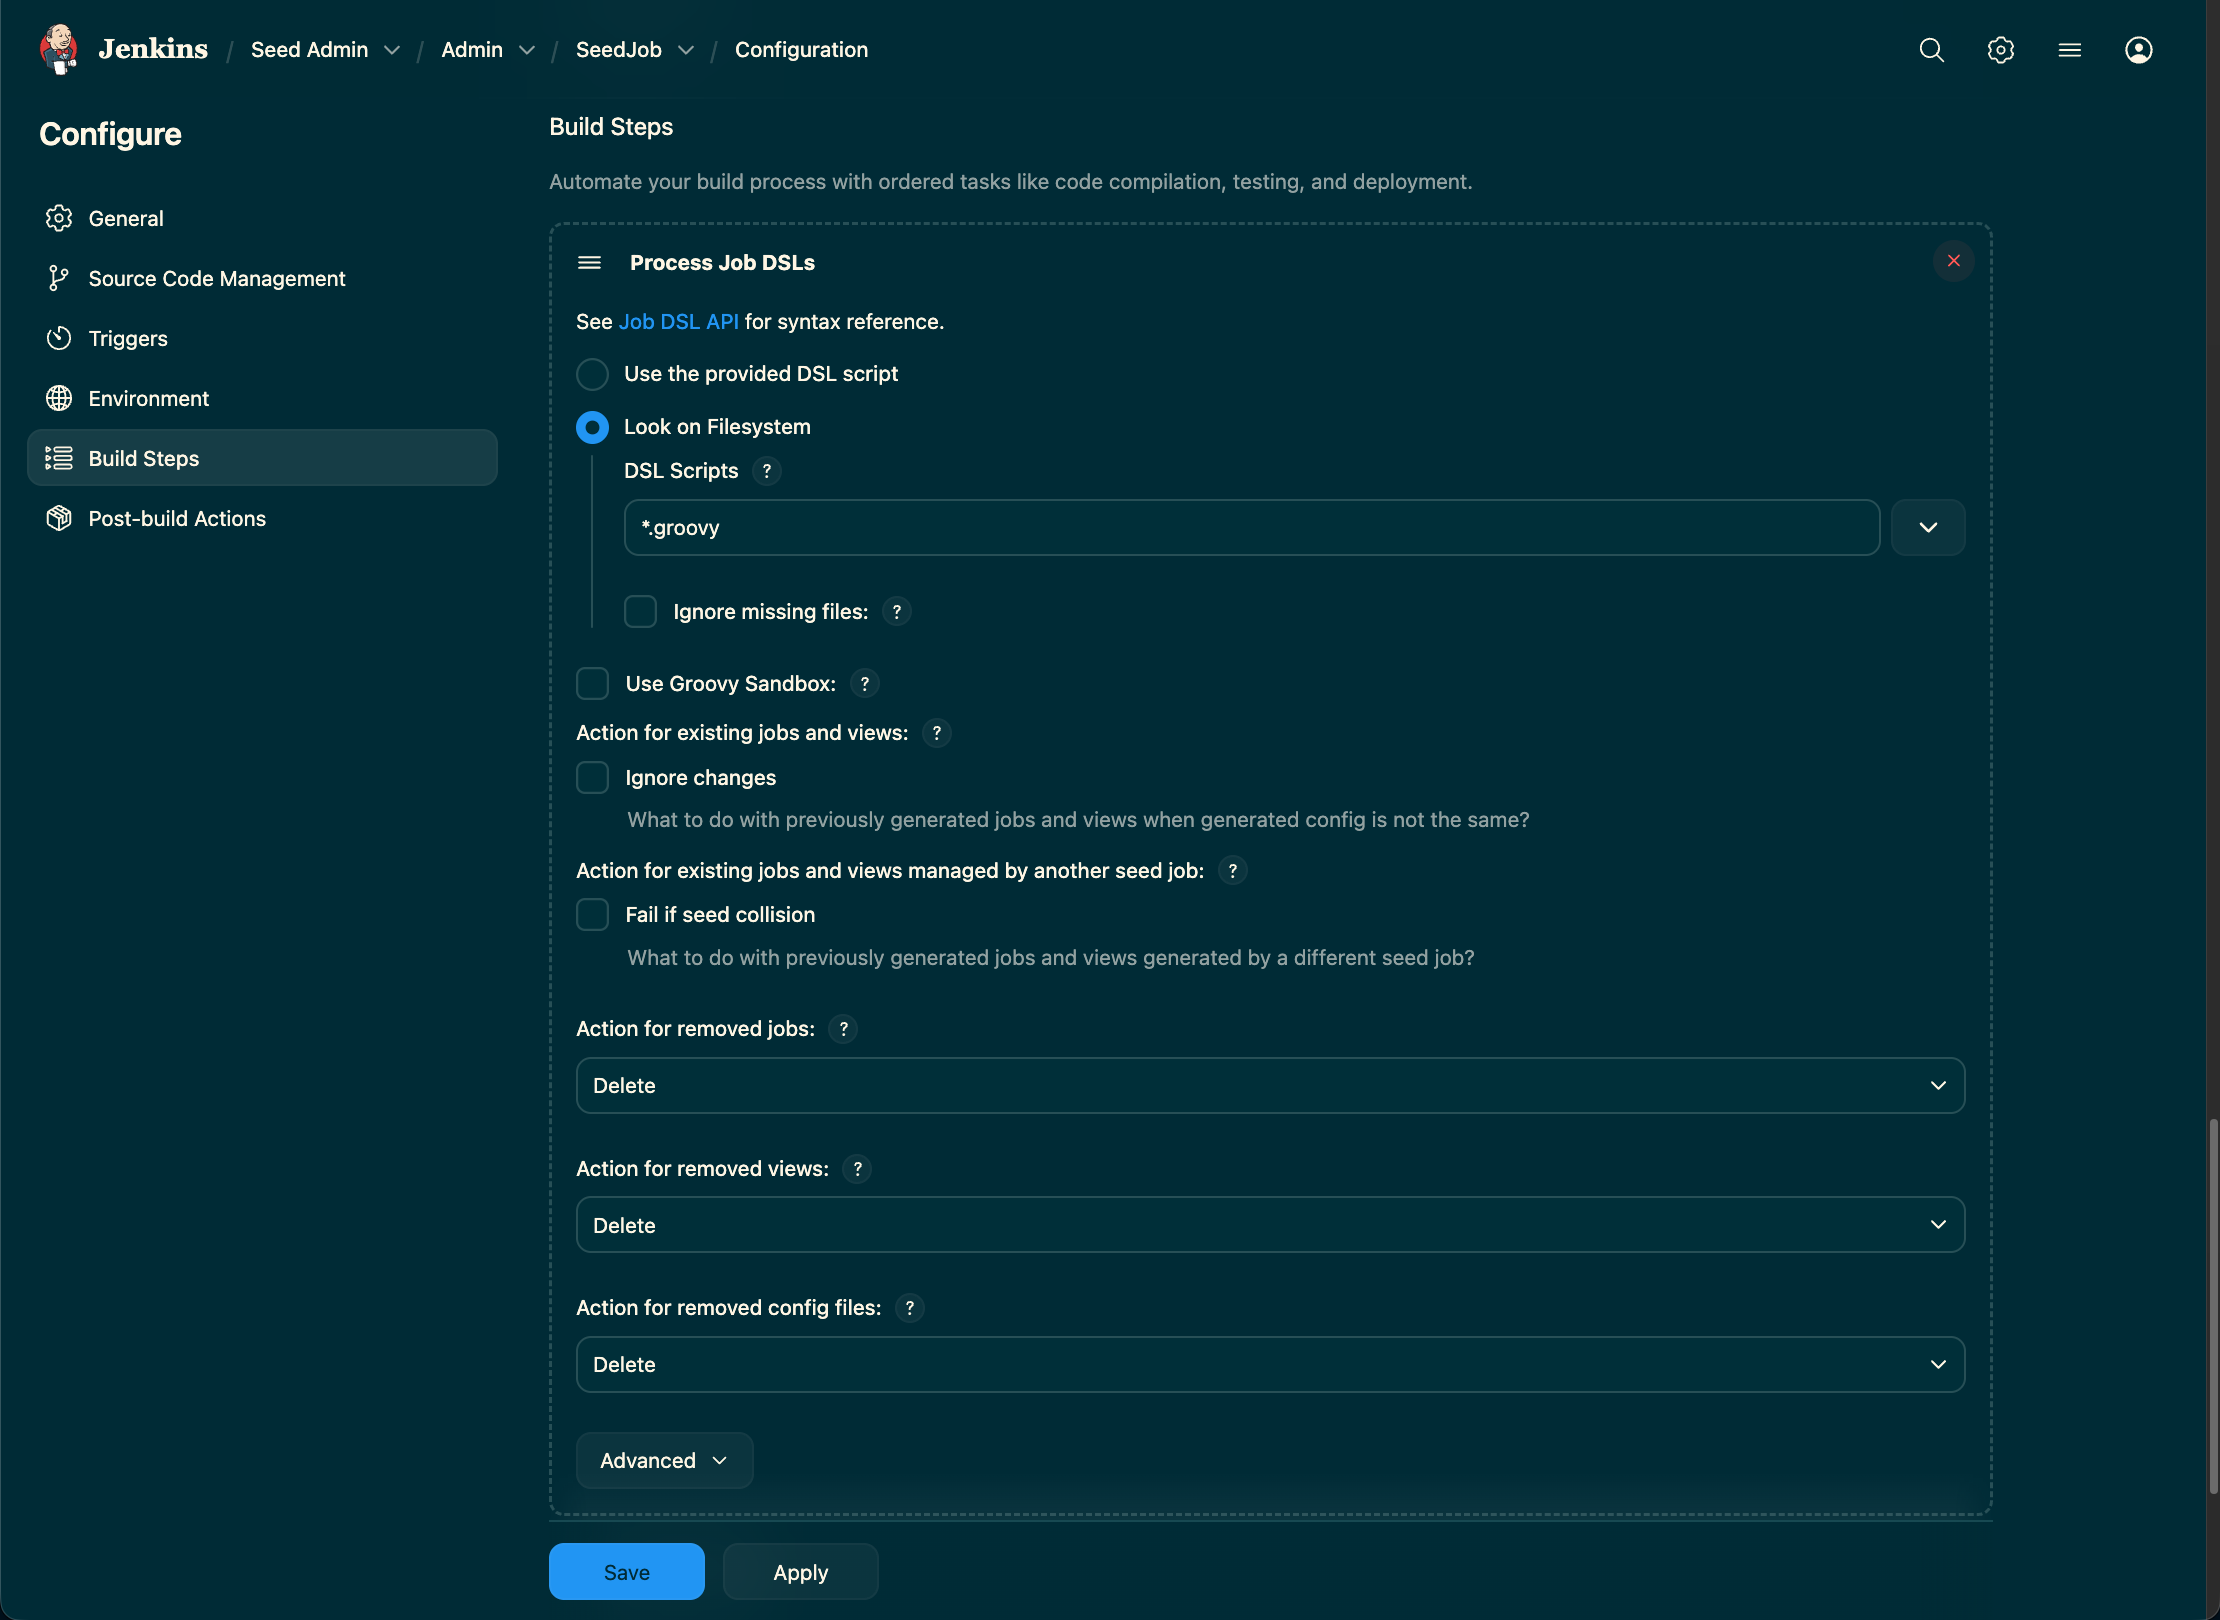
- In the Source Code Management section, select Git and enter the repository URL for the seed job repository you created in Step 3.
- In the Build section, add a build step called "Process Job DSLs".
- Select "Look on file system" and set "DSL Scripts" to
*.groovy. - This tells Jenkins to execute the
jobs.groovyfile from your repository, which will, in turn, read your create the jobs.
Step 7. Executing the Seed job
In-Detail Description of the implementation ( Open source )
- Line number 1 defines the credential-id for authentication for the git repositories.
- Line number 2 defines the Github user / organisation as the source of git repositories for job creation.
- Line 5 onwards till line 55 is the place where you need to define your Folder structure and repository details for you to manage.
- From line 55 only change if you want to customize it further. For most use cases the defaults should be good enough.
Save the configuration and run the seed job. The job's console output will show the folders and jobs being created or updated based on your jobs.groovy file. Your Jenkins instance will now be populated with the structure you defined.
Conclusion
After completing the above steps we have 1. An easy to manage git repository to define your jobs and the job hierarchies in a well structure manner. 2. Mechanism / Framework to track our Jenkins job following good Devops / DRY principles that is scallable with minimal changes. 3. Management of Jenkins Job that follows GitOps Principles which is also good for DR planning. You can see the output of and LIVE implementation of this on Agile Guru Devops Portal at our Own Jenkins instance .
Author : Guru Raghupathy , 20 January 2026